
Starting off
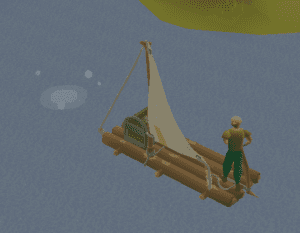
Complete the Pandemonium quest starting in Port Sarim. This will teach the player about the skill and give a raft as a reward.
- While sailing, be aware of ocean encounters (described below) to gain additional passive experience.
- Check out the notice board and complete courier tasks between Port Sarim and The Pandemonium to get some early experience.
- At level 7, you can complete two tasks at a time.
- At level 10, you can expand your courier tasks to include Musa Point as well.
- Level 12: Complete Prying Times to obtain the crowbar for sea charting.
- Level 15: Buy the Skiff, a bigger boat that can be equipped with a salvaging hook to start with shipwreck salvaging.
- Level 22: Complete Current Affairs to obtain the current duck for sea charting.
- Start focusing on sea charting (described below).
- Level 30: Unlocks Barracuda Trials, which are unique Sailing training obstacle courses. These offer much more experience compared to courier tasks.
- Level 31 offers the teak hull, boosting your boat’s base speed making trials easier.
- Level 38: Unlocks the mermaid guide tasks. At this point, you can finish charting both the Ardent and Sunset oceans for their experience bonus.
- Level 45: Complete Troubled Tortugans, then chart the Unquiet Ocean (requires level 47 to land on The Onyx Crest).
- Courier tasks from The Summer Shore are now the highest experience option until Level 55 (see below).
- Level 55: Unlocks the teleport focus facility to summon your boat to any dock.
Quests
| Quest | Experience reward |
Sailing requirement |
Other requirements |
|---|---|---|---|
| Pandemonium | 300 | – | – |
| Prying Times | 800 | ||
| Current Affairs | 1,400 | ||
| Troubled Tortugans | 10,000 | ||
Sea charting
Sea charting is a method of training Sailing by performing specific tasks across Gielinor’s oceans with specific tools. Sea charting tasks can be discovered and tracked via the Captain’s log which is given during the Pandemonium quest. Completing these tasks rewards the player with one-off experience rewards, with bonus experience for completing all the sea charting tasks in a given area. Alongside this, players can claim additional experience from Chartin’ Charles McAtless alongside the bonus experience from completing specific task sets.
Players are recommended to start their Sailing training via charting as it provides better experience than courier tasks. Sea charting at level 22 can provide around 10,000 experience per hour, the majority of which comes from completing regions – thus a spyglass and current duck are highly recommended after completing Current Affairs. If the player focuses on sea charting, stopping only to do the quests as soon as possible, one can get level 45 for Troubled Tortugans without other training methods.
Fully charting an area unlocks rapids within that area to make you faster (usable with an iron helm or higher). In order to complete all of the tasks in all oceans, players must have 78 Sailing (not boostable). The player should keep their starting raft, as a few of the tasks require it to get to areas that skiffs and sloops cannot reach.
Ocean Encounters
While sailing, you can earn passive experience interacting with random events in the ocean. These have no level requirements.
- Sail through mysterious glows repeatedly.
- Sail through strong winds then trim your sails repeatedly.
- Rescue castaways and bring them to a dock.
- Talk to Ocean Man for a cocktail.
- Sacrifice an alchable item to giant clams for a pearl.
- Retrieve lost goods.
- Retrieve clue turtles.
Fastest experience
Barracuda Trials
Barracuda Trials offer the fastest experience from level 30 onwards. There are three trials – The Tempor Tantrum unlocked at level 30, The Jubbly Jive unlocked at level 55, and The Gwenith Glide unlocked at level 72.
Gameplay involves navigating obstacle courses at sea in which players must satisfy two requirements; one unique to the trial and the other collecting lost supplies scattered across the trial grounds. Each trial has three ranks of difficulty (Swordfish, Shark, and Marlin), with increasingly strict time limits and collection requirements. The first completion of each tier awards additional bonus Sailing experience and unlocks the ability to attempt the subsequent tier. Your fastest completion time and achieved ranks are tracked by the scoreboard.
| XP / Trial | XP / Hour(Target time) | XP / Trial | XP / Hour(Target time) | XP / Trial | XP / Hour(Target time) | ||
|---|---|---|---|---|---|---|---|
| 30 | The Tempor Tantrum | 634 | 19,342 | 1,103 | 21,938 | 1,907 | 24,519 |
| 55 | The Jubbly Jive | 2,392 | 64,746 | 4,270 | 80,905 | 8,176 | 88,923 |
| 72 | The Gwenith Glide | 4,100 | 113,538 | 9,315 | 144,543 | 18,160 | 172,496186,246 (with crystal extractor) |
Other methods
Courier tasks
Courier tasks involve taking one or more pieces of cargo between different ports. Once a courier task has been accepted, the player will need both hands free to collect cargo from the ledger table at the pickup location and place it into their cargo hold aboard their boat. Depositing the cargo at the destination’s ledger table rewards the player with Sailing experience and items useful for shipbuilding such as logs, nails, and gems.
In general, more experience is rewarded for longer distance travelled between ports to pick up and drop off the cargo; because of this, accepting tasks that start elsewhere and then teleporting to that location can increase experience per hour. Players can accept multiple tasks at once at higher levels.
46-55 Summer Shore
With the completion of Troubled Tortugans, players can deliver supplies to The Summer Shore.
This method results in ~30,000 experience per hour. On average, a delivery will grant about 3,000-5,000 xp and with decent focus a player can complete ~9 trips per hour.
Method
- Start at the The Great Conch port
- Check notice board for any of these tasks: Musa Point/Port Sarim/Pandemonium -> The Summer Shore
- Charter ship to Pandemonium, check for tasks from Pandemonium -> The Summer Shore
- Charter ship to Musa Point/Port Sarim, based on what port The Summer Shore task had
- Recover your boat
- Pick up cargo, sail to Pandemonium (if task), then deliver all 3 task cargos to The Summer Shore
Note: At level 48 you can supplement with Ruins of Unkah tasks from sarim/musa if unlucky. At level 56, Unkah to summer shore becomes available.
Recommended Items
- Crewmates with the best available deckhandiness
- Skiff
- Oak Sails
- 20,000 Coins to start. Rewards from cargo deliveries cover most of the cost of boat recovery after first run
62-70 Rellekka
This method results in 55,000-75,000 Sailing experience per hour.
XP per hour is dependent on what tasks are available. Around 60k xp/h is expected at level 62 with only Rellekka unlocked, and up to 75k xp/h can be achieved after level 65 after unlocking Etceteria.
Method
- Start at the Rellekka port
- Check notice board for any of these tasks: Aldarin/Sunset Coast/Port Roberts -> Rellekka
- Prioritise Aldarin/Sunset Coast to Rellekka if it’s there, this gives the most experience for this method. If Aldarin/Sunset Coast to Rellekka isn’t there, make sure to always save a task slot for when you check Aldarin’s notice board in step 4 below
- Sail to Etceteria (if lv 65+ otherwise continue to step 3)
- Check the notice board for any of the same tasks as Rellekka (Aldarin, Sunset Coast, Port Roberts)
- Use the Quetzal Network to get to the sunset coast
- Summon to this port (confirm that the boat cargo is empty otherwise anything stored inside will be deleted)
- Load the boat with anything being picked up at Sunset coast
- Sail the boat across the bay to Aldarin
- Check the notice board for any of these tasks: Aldarin > Rellekka, Aldarin -> Etceteria, Aldarin -> Port Roberts, Aldarin -> Port Piscarilius
- Fill up any remaining task slots with any ports along the Varlamore / Zeah coast (including Port Roberts)
- Sail up the coast of Varlamore / Zeah turning in cargo, try and get more tasks from the notice boards as long as it’s on the same route to Relleka/Etceteria
- Once your last cargo is turned in Relleka/Etceteria, go back to step 1
Recommended Items
- Crewmates with the best available deckhandiness
- A quetzal whistle for quick access to sunset coast.
- An Enchanted lyre or Fremennik sea boots or other means to get to Rellekka easily.
- A teleport focus facility on your boat and Earth, Water, and Law runes for the Summon Boat spell
70-72 Prifddinas
This method results in 65,000-70,000 Sailing experience per hour.
Method
- Start at the Prifddinas port
- Check notice board for any of these tasks: Aldarin/Port Tyras/Deepfin Point > Prifddinas
- Prioritise Aldarin to Prifddinas if it’s there, this gives the most experience for this method. If Aldarin to Prifddinas isn’t there, make sure to always save a task slot for when you check Aldarin’s notice board in step 4 below
- Charter to Port Tyras
- Check the notice board for any of these tasks: Aldarin > Port Tyras, Deepfin Point > Port Tyras, Port Tyras > Prifddinas
- Teleport to Deepfin Point
- Check the notice board for any of these tasks: Aldarin > Deepfin Point, Deepfin Point > Port Tyras
- Teleport to Aldarin
- Check the notice board for any of these tasks: Aldarin > Prifddinas, Aldarin > Port Tyras, Aldarin > Deepfin Point
- If you didn’t get an Aldarin > Prifddinas task from the Prifddinas Notice board, get one here as your 4th and last task
- Summon your boat to Aldarin and start making your way to ports. As you turn in cargo, try and get more tasks from the notice boards as long as it’s on the same route to Prifddinas
- Once your last cargo is turned in at Prifddinas, go back to step 1
Recommended Items
- Crewmates with the best available deckhandiness
- Coins and a Ring of Charos for cheaper charter rides
- Sailor’s Amulet for Deepfin Point teleport
- An Aldarin Teleport method
- A teleport focus facility on your boat and Earth, Water, and Law runes for the Summon Boat spell
76+ Lunar Isle
This method focuses on getting as many round trip tasks from Lunar Isle as possible and then filling up remaining tasks as you sail to Lunar Isle. At level 84 Sailing you can store up to 5 courier tasks at a time which results in 120,000-145,000 Sailing experience per hour. Experience rates vary depending on what tasks are available on the notice board and the use of a crystal extractor.
Method
- Start at the Lunar Isle port
- Check notice board for any of these round-trip tasks and accept as many as you can. It’s very unlikely all will be available:
- Aldarin > Lunar Isle (10017 experience)
- Deepfin Point > Lunar Isle (7188 experience)
- Civitas illa Fortis > Lunar Isle (5836 experience)
- Port Roberts > Lunar Isle (4626 experience)
- Prifddinas > Lunar Isle (4341 experience)
- Piscatoris > Lunar Isle (2491 experience)
- Check notice board for any of these round-trip tasks and accept as many as you can. It’s very unlikely all will be available:
- Teleport to Deepfin Point and charter to Prifddinas
- Check the notice board for any of these round trip tasks:
- Aldarin > Prifddinas (5604 experience)
- Deepfin Point > Prifddinas (3736 experience)
- Check the notice board for any of these round trip tasks:
- Teleport to your furthest cargo location, usually either Aldarin or Deepfin Point
- Check the notice board at your starting port for any one-way tasks to fill any remaining task slots.
- Summon your boat to you and start making your way to ports. As you turn in cargo, try and get more tasks from the notice boards to maximize experience
- Once your last cargo is turned in at Lunar Isle, go back to step 1
Tips
- If you have a crewmate piloting the ship, prepare cargo that you want to deposit as you’re sailing to your destination so you can easily disembark.
- Only sail to the Civitas illa Fortis and Port Piscarilius ports if you have a one-way task to drop off there. If you’re at a point in your journey where you need to fill up task slots, it’s best to prioritize checking ports on your way to Lunar Isle like Port Roberts, Port Tyras, and Prifddinas rather that adding extra distance for little experience.
- If you’re full on tasks and sailing from Prifddinas to Lunar Isle, you can sail through the black portal in the Gwenith Glide trial to get you closer to Lunar Isle.
Recommended Items
- Crystal extractor for extra Sailing experience as you sail from port to port
- Crewmates with the best available deckhandiness
- Coins and a Ring of Charos for cheaper charter rides
- Sailor’s Amulet for Deepfin Point teleport
- An Aldarin Teleport method
- A Lunar Isle teleport method
- A teleport focus facility on your boat and Earth, Water, and Law runes for the Summon Boat spell
Bounty tasks
Bounty tasks are unlocked at level 30 Sailing. Bounty tasks assign players with a specific seafaring monster to kill in hopes of collecting a specific item as a drop (similar to Hunters’ Rumours). This is a middle ground method between salvage and trials, ideal for players who want to put some effort but not too much.
It’s possible to take multiple bounty tasks at the same time for the same enemy. For instance, each enemy has more than 1 potential item that it drops for a bounty, and as such it is possible to get two tasks for one single monster, vastly improving experience rates as it kills two birds with one stone. Pick the highest leveled ports, ideally ones with a shared monster so this can be achieved. Pick all bird and ray tasks; for sharks, pick bull or hammerhead, and avoid all kraken tasks. Kraken are far too tedious to kill compared to other monsters of their level. Bounties are not correlated to the location (despite the description of the task saying so); once the task is accepted, all monsters of that type can drop it regardless of their location. Likewise, they can all be turned in at one port master regardless of where the assignment came from.
With proper cycling of tasks from Prifddinas and another choice (such as Rellekka), players can get very high experience rates from killing low-leveled monsters, upwards of 130,000 experience per hour or even up towards 200,000 with best-in-slot ship equipment. If double tasks are not possible, try to pick fairly easy tasks. Another option is to quickly cycle your notice board tasks. This can be accomplished by completing (roughly) 8 tasks of any variety. An extremely quick way to cycle the task list is to take courier tasks between Aldarin and Sunset coast. This is the shortest route in the game, taking around 30 seconds each way and awarding around 500xp. Using this method, tasks can be cycled in around 5 minutes, making it a good option for players who wish to hunt certain tasks –similar to Turael skipping for slayer.
The tasks offered depend on the location of the notice board. For optimal rates after 40+, try to focus on bird and ray tasks as these are quick to kill and deal little damage. Bounty tasks should not be done between 55-66 Sailing as the tasks offered at this threshold are generally not worth the effort. When 67 Sailing is reached, players should go to Deepfin Point for bounties, as they assign birds, rays and low level sharks while providing competitive experience. Kraken tasks will begin to be offered 55, although they are not too common at a board. Nonetheless, krakens should be avoided by players seeking maximum experience rates, as they take much longer to kill.
Because sea monsters take less damage from sources not from a ship cannon, players are recommended to use the ship cannon until they get their crewmate prepared, as it will deal more damage compared to other weapons despite its attack speed of 5. Crewmates can man a cannon but will deal less damage than the player themselves, and the cannons they can use depend on their privateering level. Having at least a steel cannon will help the crewmate immensely, despite them dealing less damage than a player would. Only build a mithril cannon once Oarswoman Olga is recruited, as all crewmates before her are unable to use it. Most seas outside of the starting area are multicombat. When handling easy tasks, the Hunters’ sunlight crossbow is recommended due to its 3-tick speed and the monsters’ low defence values. Magic should only be used for kraken tasks (if completing these at all) as they have negative magic bonuses despite their high Magic level and they are much more resistant to ranged than other monsters.
Completion of Song of the Elves is highly recommended, as this unlocks two additional notice boards at Port Tyras and Prifddinas respectively. These boards have shared tasks of hammerhead sharks, manta rays and pygmy krakens. If krakens are not desirable, the Priffdinas board can be combined with Deepfin Point’s osprey tasks, ensuring the most amount of double tasks on easy monsters. The level 75+ bounties begin assigning much more difficult and stronger monsters such as great white sharks, orcas, armoured and vampyre krakens, which are much more difficult to kill and only provide marginally higher experience that is generally not worth the effort.
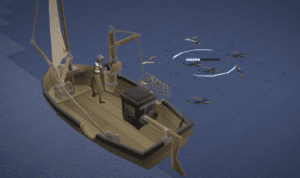
Shipwreck salvaging

Salvaging is a low-intensity gathering activity which involves sailing to sunken shipwrecks across the ocean and using a salvaging hook to collect resources from them. This can be started at level 15 Sailing, and becomes much faster at level 42 Sailing after unlocking the salvaging station schematic found on Chinchompa Island.
A crewmate with sufficient deckhandiness can operate a salvaging hook – with any salvage they acquire awarding reduced experience between 10%–40% of the normal experience relative to their deckhandiness level. Cabin Boy Jenkins (level 60 Sailing) and Jolly Jim (level 85 Sailing) both have the maximum deckhandiness of 4; Jobless Jim (level 40 Sailing) and Ex-Captain Siad (level 50 Sailing) both have a deckhandiness of 3. Crewmates will stop harvesting when there are no wrecks to salvage from, and will automatically resume when one is in range, unlike the player who will stop when all nearby shipwrecks are depleted.
Having one available crewmember per salvaging hook can be useful when taking time to clean up whenever inventory/storage becomes full from salvage: an idling crewmate can be assigned to the hook the player normally operates until the player finishes cleaning up. This can also be used as an AFK training method, requiring very little interaction but providing low experience per hour (starting at 200–210 large salvage awarding 7500–8000 experience per hour at level 55 Sailing with two crewmates, assuming the player sorts all salvage occasionally).
All shipwrecks in a given area share a spawn pool; in a typical area, there will be 6 possible shipwreck locations and up to 4 of them can be active at a time. Picking a high-population world can improve experience rates as it means more distant shipwrecks will be touched by other players, thus allowing shipwrecks near your boat to respawn faster and requiring less movement. In general, larger shipwrecks allow for longer idle time and improved experience rates.
If boosting Sailing level to salvage from shipwrecks, players are recommended to bring the best prayer-boosting gear they can obtain to utilise Preserve. For longer trips, a Prayer regeneration potion will allow players to stay for up to 5 hours before needing to leave. Crew can also salvage based on a player’s boosted Sailing level, but the level must be maintained or they will stop salvaging.
Tick manipulation is possible with salvaging hooks, though this largely defeats the benefit of being low-intensity since the Barracuda Trials offer faster experience per hour.[confirmation needed]
Experience rate estimates
These examples include time spent moving from wreck to wreck while salvaging, and from salvaging station to cargo hold while sorting, but not time spent sailing from wreck to port. Rates assume one crewmember of deckhandiness 4 and the player actively salvaging. These rates may be further increased by using the crystal extractor for up to an additional 14,286 experience per hour.
| Shipwreck | |||||||||
|---|---|---|---|---|---|---|---|---|---|
| 15 | Small shipwreck[1] | 2,000–2,800[confirmation needed] | 3,000–3,200[confirmation needed] | Unknown | Unknown | Unknown | Unknown | Unknown | |
| 26 | Fisherman’s shipwreck [2] | Unknown | Unknown | 4,700–5,800[confirmation needed] | Unknown | Unknown | Unknown | Unknown | |
| 35 | Barracuda shipwreck [3] | Unknown | Unknown | 9,500–11,000[confirmation needed] | 12,500–14,500 (1 hook)[confirmation needed] 16,000–18,000 (2 hooks) [confirmation needed] | Unknown | Unknown | Unknown | |
| 53 | Large shipwreck [4] | Unknown | Unknown | Unknown | 18,000–20,000 (1 hook)[confirmation needed] 23,000–25,000 (2 hooks) [confirmation needed] | 25,000–27,000 (2 hooks)[confirmation needed] | Unknown | Unknown | |
| 64 | Pirate shipwreck[5] | Unknown | Unknown | Unknown | Unknown | 44,000–47,000 (2 hooks)[confirmation needed] | Unknown | Unknown | |
| 73 | Mercenary shipwreck | Unknown | Unknown | Unknown | Unknown | 55,000–60,000 (2 hooks)[confirmation needed] | 65,000–70,000 (2 hooks)[confirmation needed] | Unknown | |
| 80 | Fremennik shipwreck[6] | Unknown | Unknown | Unknown | Unknown | Unknown | 65,000-80,000 (2 hooks)[confirmation needed] | Unknown | |
| 87 | Merchant shipwreck[7] | Unknown | Unknown | Unknown | Unknown | Unknown | 70,000-85,000 (2 hooks)[confirmation needed] | 80,000-85,000 (2 hooks)[confirmation needed] | |
- The location off the Shipwreck Cove between the three southern wrecks allows the player, with very precise positioning, to continuously salvage because at least one of the three wrecks is always active.
- Any of the locations where fisherman’s shipwreck can be found in has two wrecks allowing the player to continuously salvage as long as either wreck is active as long as they are between them.
- The north-west location in The Storm Tempor between two wrecks allows the player to continuously salvage as long as either wreck is active. No clicks are necessary to switch between wrecks.
- A location south-east of the Great Conch has two wrecks allowing the player to continuously salvage as long as either wreck is active as long as they are between them.
- Two locations, one south of Pest Control Island and another at Buccaneers’ Haven, contains multiple sets of two wrecks can be used to continuously salvage as long as either wreck is active as long as they are between them. Be wary of using the location at Buccaneers’ Haven as other players can lure nearby armoured krakens to the area.
- One location in the Everwinter Sea has two sets of double wrecks which can be used to continuously salvage as long as either wreck is active. This will require some repositioning since the middle wreck in the set of three is used for both sets.
- Two locations, one each in the Southern Expanse and Dusk’s Maw has a set of double wrecks which can be used to continuously salvage as long as either wreck is active.
Deep sea trawling
Deep sea trawling is a hybrid Fishing and Sailing activity, where players fish at trawling shoals using their boat’s trawling nets.
The first step to deep sea trawling is to track down a shoal of fish. Trawling shoals are found in places indicated by an icon ![]() on the world map. Optionally, players can also use a fathom stone or fathom pearl facility. The stone gives a general direction, whereas the pearl gives a hint arrow directly over the shoal.
on the world map. Optionally, players can also use a fathom stone or fathom pearl facility. The stone gives a general direction, whereas the pearl gives a hint arrow directly over the shoal.
Optionally, after tracking down a shoal, players can spread simple, or fine fish offcuts from a chum station or advanced chum station facility. This increases catch effectiveness and the rate at which shoals disperse.
The next step is to sail the ship over a shoal and deploy a trawling net while keeping the ship aligned with the shoal as it moves.
A good crewmate strategy is to have one crewmate at the helm of the boat while the player and another crewmate operate the two trawling nets. When less than three crewmates are assigned to a boat and a chum station or advanced chum station needs to be used, move the crewmate from the helm to the chum station to bait the shoal, then back to the helm. Use the Navigation interface to command the crewmate to avoid interrupting the player’s operation of the trawling net.
If keeping caught fish, consider using fish crates to extend trawling trips. Each crate can store 10 raw deep-sea fish, which greatly increases the number of fish a cargo hold can store.
Experience rate estimates
Estimates are for two nets.
| Shoal | |||||
|---|---|---|---|---|---|
| 69 | Giant krill shoal |
|
Unknown | Unknown | Unknown |
| 73 | Haddock shoal | Unknown | Unknown | Unknown | Unknown |
| 79 | Yellowfin shoal | Unknown | Unknown | Unknown | Unknown |
| 83 | Halibut shoal | Unknown | Unknown | Unknown | Unknown |
| 86 | Bluefin shoal | Unknown | Unknown | Unknown | Unknown |
| 91 | Marlin shoal | Unknown | Unknown | Unknown | Unknown |
Ship combat
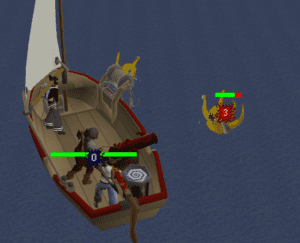
Ship combat involves players using their ship’s cannons to engage in combat with various sea creatures found throughout the oceans and seas of Gielinor. To engage in combat with a sea monster, the cannon itself must be facing the monster. Upon engaging in combat, the player’s hitpoints are replaced with the health of the ship or raft. Ship combat provides very little experience, far less than most other content but often makes up for it as a supplement when doing bounty tasks.
Players can repair their rafts/boats with repair kits, restoring some or all of the raft or boat’s health during combat. However, if the raft or boat loses its entire health, it will sink and the player(s) and crewmate(s) will be teleported to their set respawn dock point.
Players receive Ranged and Sailing experience, depending on the amount of damage dealt to the monster: 4 Ranged experience per damage plus 1 Sailing experience per damage. Some rough expectations:
- Iron cannon with iron cannonballs: 4000–5000 Sailing experience per hour.
Crystal extractor
A crystal extractor can be built in a facility spot on your boat at 73 Sailing and 67 Construction. Its purpose is to generate wind motes for a wind catcher or gale catcher, which is useful for high level Barracuda Trials.
Harvesting the extractor grants 250 Sailing experience. The extractor can be harvested roughly every 63 seconds (60 seconds to generate a mote plus a few seconds to use it). Using it as often as possible offers 15,000 Sailing experience per hour, with 10,000 being more realistic (used every 90 seconds).
This experience can be gained on top of other training methods, such as while charting, salvaging, trawling, barracuda trials, or simply moving around the world.
If a crystal extractor is placed in the spot to the right of the helm on a skiff, it can be activated without the player exiting the helm, allowing it to be done during sailing. On a sloop the extractor must be placed above and to the left of the helm instead, for the same purpose. However, if using a sloop primarily for salvaging, it is recommended to instead place the extractor next to the salvaging hook the player primarily uses.