


Today we’re journeying deep below Varlamore, where a dangerous new dungeon awaits…
Lurking below the surface is an ancient temple, built to contain powerful entities. Now, the earth has been disturbed – and the dwarves need your help to keep these strange beings contained!
If you’ve read the Varlamore newspost, you’ll already know that this new dungeon is accessed via Perilous Moons, an experienced-level quest that will see you delving into the depths of Cam Torum and getting your first glimpse at the mysteries within.
The quest will reveal a new chunk of PvM content aimed at mid-level players. The dungeon holds three deadly demi-bosses. Defeat them, and you’ll reemerge with some exciting new loot!
If you can’t tell, this encounter is heavily inspired by the iconic Barrows Brothers – a mid-level combat staple! Unlike Barrows, however, this activity focuses on discovery and exploration. We want you to feel like you’re progressing through the dungeon in a meaningful way, learning more about Varlamore’s ancient history as you go. We’re taking all the best bits of Barrows and the Forthos Dungeon to create a new, well-rounded adventuring experience.
We recommend tackling the dungeon with a combat level of 65 or more. Down in the depths, defence is key – so you’ll want to prepare carefully before heading in.
Now that you know what you’re in for, let’s take a closer look…

However, only one corridor will be open to you each time you enter – meaning that every encounter begins slightly differently to the ones before it.
Once you’ve explored your starting corridor, you’re free to move around and tackle the bosses in any way you like – although taking on the one closest to your starting location will obviously save you quite a bit of time.
Each room in the temple contains enemies to fight, shortcuts to cross, and opportunities to flex your skilling muscles. Although the temple has seemingly been abandoned for many centuries, you’ll have the opportunity to acquire food and Prayer restoration items that will help you achieve your goal. Please note that nothing you acquire inside can leave the temple again – they’re just there to help you restock between fights. Of course, you’re also free to bring your own supplies, although you’ll find that making use of the dungeon’s resources is faster than trekking to the nearest Bank.
Resources aren’t the only thing you’ll find in the temple’s depths – you’ll also encounter some nasty foes to fight! They’ll drop useful stuff like bones and herbs, and of course, you’ll also receive XP for defeating them.
Base camps around the dungeon will let you store and retrieve tools for Hunter, Fishing, and other gathering skills, so you’ll always have the ability to gather those precious resources when you need them.
After spending some time exploring the dungeon and shoring up your supplies, it’s time to face the demi-bosses…

Just like Barrows, the temple is home to several different bosses. The more you defeat, the better loot you’ll get!
It doesn’t matter which demi-boss you tackle first, as your chance of loot is only affected by how many of them you defeat. Subdue all three, and you’ll have the best loot in the bag!
A Combined Effort
Unlike the Barrows Brothers, these demi-bosses can be fought by multiple players at the same time. Without dropping any spoilers, these powerful entities cannot be killed – your job is to distract them to ensure they remain contained within the temple.
To this end, we’re doing things a little differently. Instead of having one big health bar that you and your companions are working to deplete, every player involved will have their own individual health bar. This means that other players’ participation (or lack thereof) won’t affect your reward potential. Go solo, or bring your friends – either way, you’ll get your just reward.
However, this also means that the bosses will attack you all as a collective, using the environment around them to damage players en masse. You’ll need to stay alert to avoid taking damage!
Each of these bosses also provides an opportunity to learn and practice key mechanics you’ll need to master to face more challenging foes later in your adventuring career. It’s a great way for new players to familiarise themselves with some of the tougher elements of PvM!
Obviously, we also plan to include never-before-seen mechanics to keep you on your toes – but discussing them here would spoil the surprise!
Defence is the Best Offense
As we mentioned above, Defence is a keystone of this content. Most gear, especially in the late-game, focuses on offensive bonuses – with the notable exception of Justiciars. Mid-game gear, however, tends towards more defensive bonuses – and that’s what we want to encourage here.
The bosses share a mechanic which highlights the importance of Defence – and each individual boss also has their own way of lowering your DPS when you take damage.
Each boss’s basic attack will hit three times, and each hit is harder than the last. However, should any one of those attacks miss, the others will miss as well. This means that to preserve your DPS, you’ll need to have a strong defence.
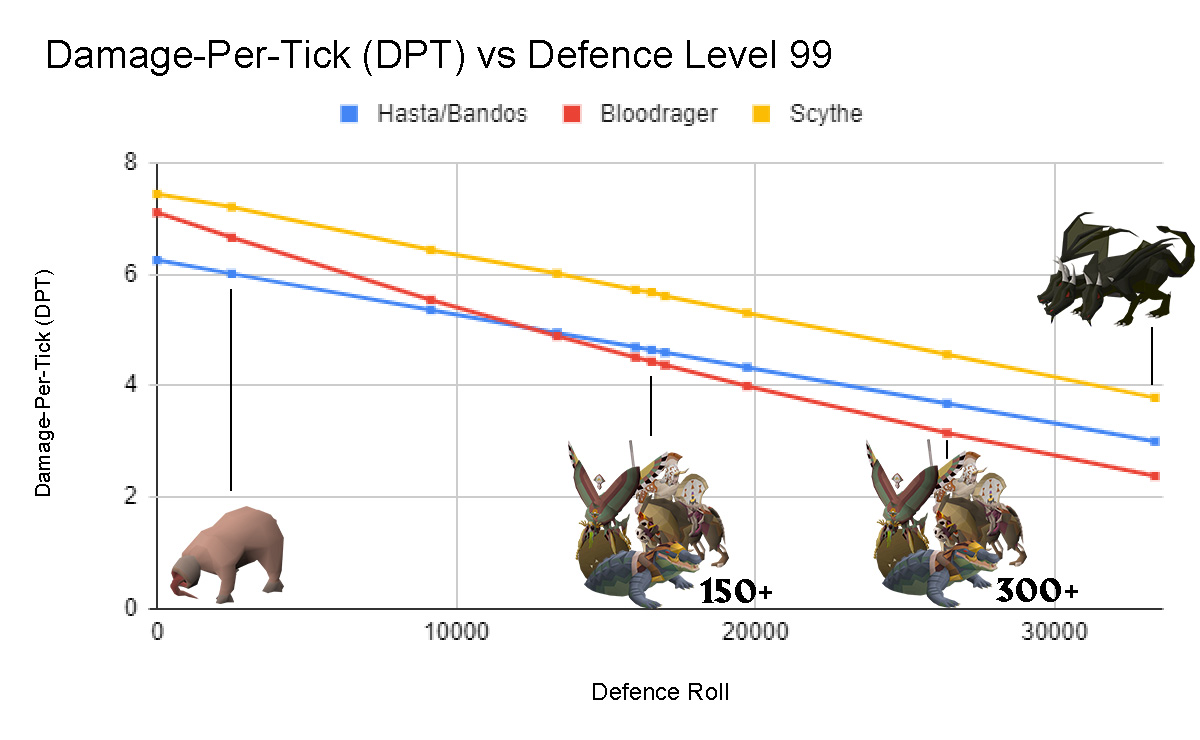
Below, we’ve got some very rough examples of how this might shake out with different gear. We want to stress that these numbers are not final and are simply here to illustrate how important Defence will be.
Defence Breakdown – CLICK HERE TO SHOW
| Equipment | Stats Overview | 1st Attack Chance – 10 Damage | 2nd Attack Chance – 20 Damage | 3rd Attack Chance – 40 Damage |
| Fighter’s Torso / Obsidian Platelegs | Low Defence | 60% | 36% | 21.6% |
| Bandos | Medium Defence | 50% | 25% | 12.5% |
| Barrows Armour | High Defence | 40% | 16% | 6.4% |
As you can see, the higher your Defence, the better you’ll fare.
After you’ve subdued one demi-boss, it’s up to you whether you want to tackle the remaining two or go straight for the loot. Again, if you want to snatch those uniques, you’ll want to distract all three bosses – but if you’re not feeling up to it, you can always tap out early.
Now, let’s have a look at those uniques in detail!
Those dinosaurs who played before Barrows launched will remember that before the Brothers entered the scene, weapons only ever did damage – their unique weapons were the first to include their own special mechanics. This shook up the combat scene for decades (two of them) to come, and we want to do something similar with these rewards.
Accordingly, the armour sets we’re about to present break the mould significantly. We’re really keen to hear your thoughts on this, so read carefully, and let us know what you think on all the usual channels!
Please note: All of these sets only trigger their set effects and a weapon’s special effect when wearing the complete set.
Now, however, it’s time to turn our eyes to the skies, and bask in the glow of the blood moon…
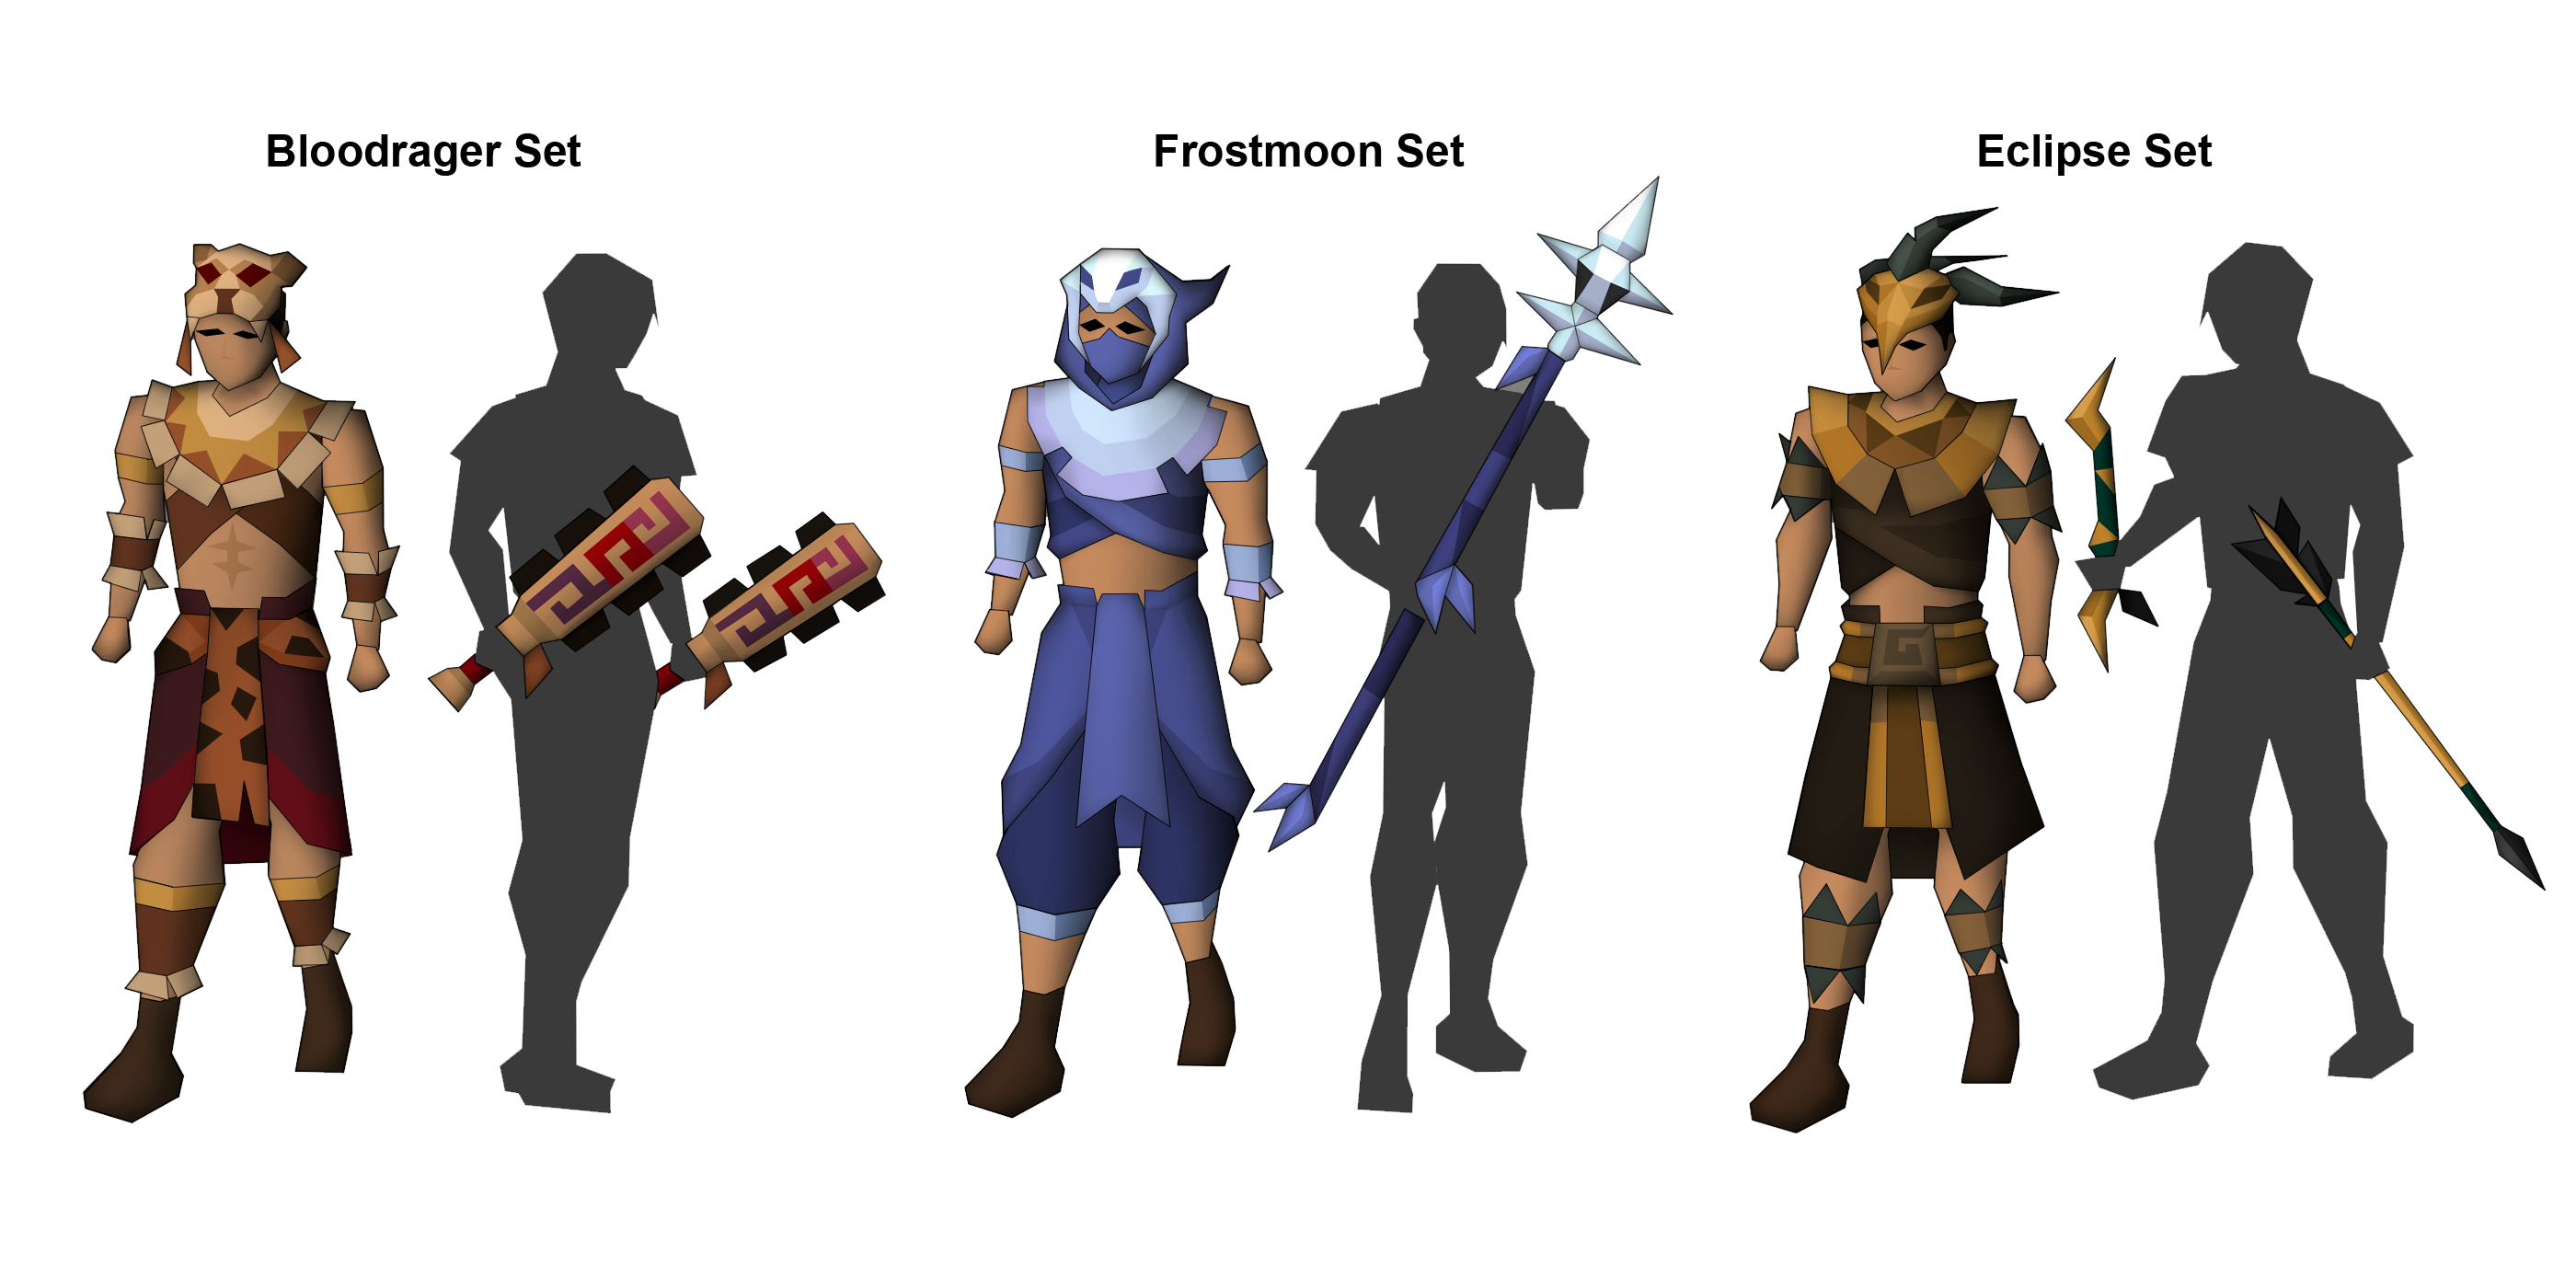
Bloodrager Set
Bloodrager Set Stats – CLICK HERE TO SHOW

Drawing power from the angriest phase of the moon, the Bloodrager Set evokes memories of ancient bloodthirst in the wearer, causing them to rip and tear through low-defence targets in a devastatingly ferocious assault.
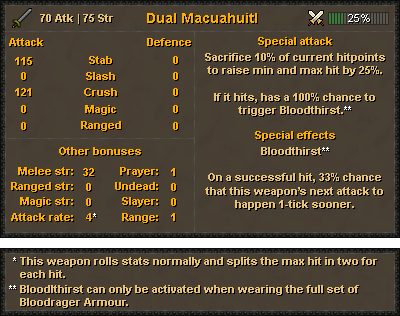
The Dual Macuahuitl has a speedy attack rate of 4 ticks, and get this – they hit twice!
They also come with a Special Attack, allowing you to sacrifice 10% of your current Hitpoints to raise your maximum and minimum hit by 25% for that attack. At just 25% energy cost this might seem like a no-brainer, but watch out – use it too many times in a row, and you’ll find yourself low on HP!
Wearing the full set will also earn you a nifty Set Effect: a 33% chance for the Dual Macuahuitl’s second attack to hit one tick sooner. Using the Special Attack with the full set equipped makes that a guarantee, enabling you to slice and dice with unparalleled speed.
For lower-defence foes this set is a gamechanger, although they become less effective against higher-defence enemies.
Dual Macuahuitl DPS Table – CLICK HERE TO SHOW
Frostmoon Set
Frostmoon Set Stats – CLICK HERE TO SHOW

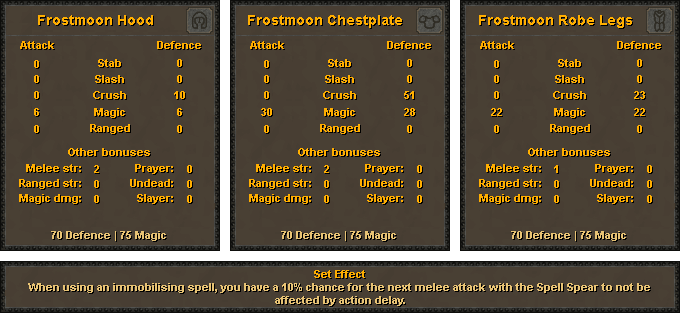
Feeling blue? Not for long! The Frostmoon Set focuses on both Melee and Magic and immobilises enemies with the sheer cold of the Frostmoon.
Its main benefit is strong Magic accuracy compared to other midgame sets, combined with defensive capabilities against both Magic and Crush styles.
The real star of the set, however, is the Spell Spear, a melee weapon that hits significantly harder than your standard staff while allowing you to auto-cast whatever spells you like. With a 5% increase to Magic strength, you’ll be freezing your enemies in their tracks and doing some serious damage.
The Frostmoon armour’s set effect gives you a 10% chance for your next melee attack to go unaffected by any action delay – although this only affects attacks made with the Spell Spear. Put those Dragon Claws away!
You’ll deal even more damage with the Spell Spear’s Special Attack, which increases your max hit by 1% for every tick remaining on a target inflicted with a binding effect. Once you’ve dealt your deadly blow, the binding effect will be removed – so choose your moment carefully before going in for the kill!
For example: if your target has 10 ticks remaining on their binding effect, hitting them with the Spell Spear’s Special Attack will increase your max hit by 10%.
Eclipse Set
Eclipse Set Stats – CLICK HERE TO SHOW
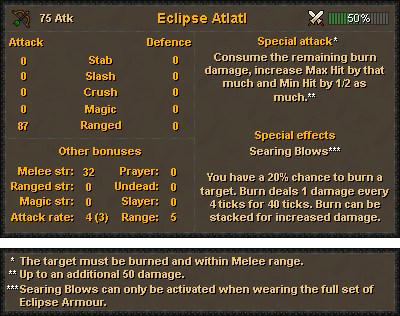

The next stop on our celestial journey is to the all-consuming maw of the Eclipse. This set combines the sharp sting of the arrow with up-close-and-personal melee carnage as you burn your foes and consume the fire to unleash a devastating flurry of flames!
Like the Frostmoon gear, this is a hybrid set. Eclipse combines great Ranged accuracy and Melee strength to create a deadly offence, at the cost of its defensive capabilities.
The set includes the Eclipse Atlatl, a new Ranged weapon with an attack speed of 4 (3 on Rapid).
The Set Effect gives the wearer a 20% chance to inflict Burn, a new effect that causes the target to suffer 1 point of damage every 4 ticks for 40 ticks – a total of 10 base damage. However, the effect can be stacked up to five times to rack up even more damage over time. Yowch!
Burn Effect Breakdown – CLICK HERE TO SHOW
Here’s how that might play out, we’ve got a text description and a handy little table:
- I’m damaged with Burn, so I’m going to suffer 10 damage over 40 ticks.
- 16 ticks later I’ve suffered 4 damage – oh no, I’ve been burned again!
- I’m now getting damage from the original Burn in addition to damage from the new one!
- Once the original Burn is gone, I will have been damaged for a total of 16 HP (10+6), with 4 damage left from the second Burn.
| Tick | 0 | 4 | 8 | 12 | 16 | 20 | 24 | 28 | 32 | 36 | 40 | 44 | 48 | 52 | 56 | 60 |
| Burn #1 | ||||||||||||||||
| Burn #2 | ||||||||||||||||
| Damage | ||||||||||||||||
| Total Damage |
The Atlatl’s Special Attack costs 50% Special Attack energy and consumes any remaining Burn damage on the target to increase your max hit by that number, and your minimum hit by half of that number. While this is a massive boost, we have capped it at an additional 50 damage – we don’t want you setting the world on fire!
So, what do you think? Are these sets going to shake things up sufficiently? Let us know!
Meanwhile, there’s one more reward we want to talk about…
Bladed Moon
Bladed Moon Stats – CLICK HERE TO SHOW

The final, untradeable reward combines offense and defence to create a new weapon – the Bladed Moon.
This off-hand weapon combines the defensive capabilities of a shield with the offensive power of a Defender. Defensively, it has similar stats to the Mithril Kiteshield. Offensively it provides some increase to Stab, a higher Slash bonus than any existing Defender, and one less Melee strength bonus than the Dragon Defender.
To acquire this new weapon, you’ll need to combine Blood, Eclipse, and Blue Moon Spikes, obtainable from each of the three bosses.
That’s all for now! We hope you’re as excited as we are to try out some new reward spaces and explore the depths of Cam Torum. Catch us on Twitch today at 4:30pm BST, where we’ll be discussing all the above rewards and taking a second look at the Fortis Colosseum. Don’t miss out!
Mods Abyss, Arcane, Archie, Argo, Ash, Ayiza, Boko, Bruno, Chilly, Crystal, Curse, Daizong, Dylan, Ed, Elena, Enigma, Errol, Fed, Gecko, Gizmo, Goblin, Grub, Halo, Harold, Hend, Hornet, Husky, Jalo, Jerv, Keyser, Kieren, Kirby, Kurotou, Lenny, Light, Mack, Manked, Markos, Maylea, Meat, Moogle, Morty, Necro, Nox, Nylu, Other, Pumpkin, Redfield, Regent, Rice, Roq, Ry, Sarnie, Shroom, Sigma, Skane, Skylark, Sova, Squid, Starry, Stevew, Surma, Sween, Tide, Titus, Torrance, Tsourorf, Tyran, Veda, Vegard, West & Wolfy
The Old School Team.
